Connecting your iPad to a wireless network
This page will assist you in connecting your iPad to a wireless network.
Step by step guide
Connecting your iPad to your wireless network for the first time is a straightforward process.
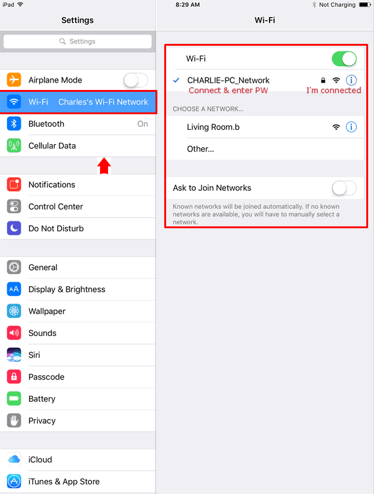
- From your Home screen, open Settings.
- In the top of the navigation menu, tap on Wi-Fi. Make sure the Wi-Fi is turned on.
- A new screen will slide in from the right, showing a list of available wireless networks. Press the name of your network, and enter the password when requested.
- Underneath the Wi-Fi heading on the right of the screen, you should see your wireless network with a blue tick. This means that you're connected!


If you need further assistance, please see the Apple Support site.
What is the recommended Wi-Fi channel range for Apple devices
Apple recommends that you use channels that are available for use in your country. In New Zealand, these channels are 1-11 for a standard 2.4 Ghz wireless connection with the bandwidth setting of 20 Mhz.
For a 5 Ghz wireless connection it is best to leave the channel selection on your wireless router to Auto.